 |
| Basil sprouted 4 days after planting |
On Recycled Seed Starters, DIY Planters, and Garden Plans
Late in the evening on May 13th I started a simple herb garden in my window. I have been saving empty 2-litters, plastic coffee containers, and collecting pre-loved bras for at least 2 weeks now (though the bras admittedly have been waiting much longer to be re-purposed) in an effort to have garden containers readily available when I need them. My herb seeds (basil, chive, and parsley to start) poked a few sprouts above the soil the two days ago (May 17th) and seem to be doing well so far. Today (May 19th) my chives have started to show and my basil is looking great! I know that in another 2-3 weeks I will most likely need to transplant them so today I am trying to plan ahead for the next steps of my urban garden project. As part of my full-cycle process I want to document every step of the process from seed, to table, to compost, and back to seed again.
 I started my herbs from seed, not because this is the easiest option, but because it is the cheapest. My mother bought me a starter set that came with the soil, seeds, a little plastic greenhouse, and adorable Terra Cotta pots that I would not have spent my own money on. Had my mom not bought me the starter set I would have used one of two recycled options to start my seeds, either empty toilet paper tubes or a cardboard egg carton. I will quickly cover both of these methods since I will have more opportunities to explore them in depth later.
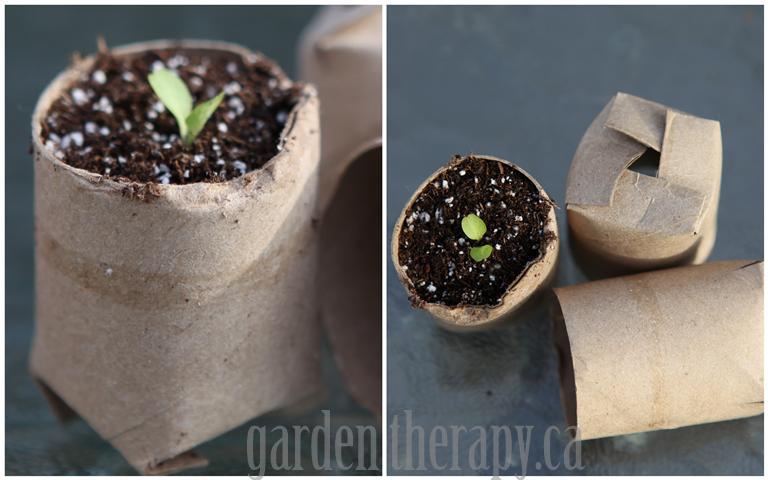
To use an empty cardboard tube for seeds simply save the tubes that toilet paper and paper towels come on. Toilet paper rolls need to be cut in half while paper towel rolls need to be cut into more segments. Each cardboard tube segment should be about 2" long. Once you have your cardboard tubes segmented cut 4 slits 1/2" long on one side and turn in the segments like shown in the picture. This will keep soil in while still letting water drain out. Fill with soil and plant seeds as recommended on pack. When ready to transplant you can either leave the plant in the cardboard starter and it will break down over time, or you can take the plant out to speed it's capabilities of spreading roots.

The process of using egg cartons is less work initially. Make sure the egg carton is cardboard, not Styrofoam as some of them are. Poke a few small holes in the center of each egg pocket to allow better drainage and fill with soil. Plant seeds as recommended on pack. When ready to transplant pop out each section one at a time and transfer to larger pots.
The amount invested at this moment is $4.07 and I will count it even though it wasn't actually my funds. I estimate the cost would have been similar had I bought a bag of soil and seeds and used recycled seed starters instead of getting cute little pots from my mom. Luckily I will have these pots for future seeds but at some point I know I will be using recycled seed starters as I only have 6 little pots.
The things I will need when I am ready to transplant my herbs are a container at least 4-6" deep, soil, a room with plenty of light, and water. For my herbs I am going to start them in two types of containers to see which one does better. A handful of basil, parsley, and chives that have started will go into one of each container. The first type is made from recycled two-liter bottles and clothesline. The second I sewed from scraps of fabric and old bras.
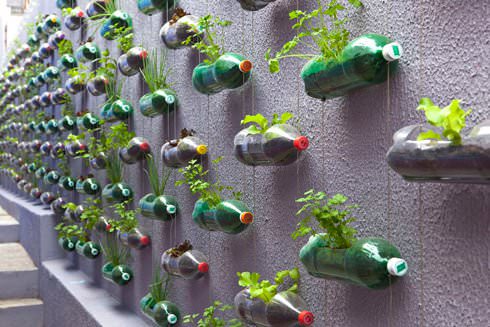 |
| Makeover by Rosenbaum |
To make planters for herbs from empty 2-liter bottles scissors, nail, and a hammer or a rotary tool will work. I wash mine with plain water and take the labels off. I then use my rotary tool to drill 5-7 small holes in a line vertically where the label was. As the container will be hung on its side these holes will face down and act as drainage. Opposite the line of holes I cut an oval roughly 7" long by 3" wide. This large oval is where the plant will be placed. Toward the top of the bottle I drill 2 small holes on either side of the oval (about an inch away) and repeat this toward the bottom. Then I flip it over so that the drainage holes are facing me and I drill 4 holes opposite the ones I just drilled on the top. These holes are where the 2-liters get strung together so that they will hang in a manner that is organized and gives you the most space. I used plain clothesline that I already had but any sturdy type of twine or cord would probably work just as well. To make the top tier of my hanging planter I thread one long cord (about 6' long) through all the top holes on one of my bottles and tie a knot so that it can hang from a hook. This means there are 4 lines going from points around the large oval all the way to the place the planter is hung from. To attach the second tier cut two lengths of cord just over double the distance you want the tiers to hang apart. One cord connects the lower left portion of the first bottle to the upper left portion of the second bottle while the other cord connects the right sides of the bottles. When properly strung the 2-liters will lay on their side (keep the caps on) one about a foot directly above the other. To have more tiers to grow in simply repeat the process with more bottles until you have the number of layers desired. For more examples of this see the article I read.

The recycled bra planters are my favorite concept container but I haven't tried it yet myself to say if it works. I have 3 small bras that I took the underwire out of and fastened on the largest setting. Then I sewed a rectangular scrap of fabric in the bottom of the torso hole to make a bowl. (If you decide to make one yourself and are sewing with a machine make sure you are careful stitching around the metal fasteners so you don't break a needle.) I plan to mount these with hangers and try one of each type of herb in them.
I researched composting options today because I can see how my house would benefit from reducing the amount of waste we generate and saving money on fertilizer as well as I see it as an opportunity to teach my son about the full cycle of life. I decided to do vermiculture which is composting with worms. They speed up the process and reduce the smell making it my ideal option. My small garden room is actually a stairwell entry so everything I grow has to fit in the width of a narrow stair. I will be purchasing red wriggler worms, soil, and some plastic totes which I estimate will cost around $40 if I have to buy new. If I happen upon two garbage bins in goodwill I will probably think about that as a cheaper option. I just have to be able to drill holes in it so the worms can breath. I can't wait to see that little boy excited look on my son's face the first time he sees a worm!
 |
| Chive Sprouts - 6 days after planting |
No comments:
Post a Comment