Thursday, December 13, 2012

Genetic Gaurding or Growers Grave - You Decide


A Patent is the exclusive right granted by a government to an inventor to manufacture, use, or sell an invention for a certain number of years. People often apply for a patent to protect their creations and inventions from others who would copy it to make money. How does this apply to plants though?

Plants have been here since man can remember. Plants were not created by man. In the United States a grower can apply for a patent on any number of unique genetic lines that they helped start. Does this mean they "invented" that genetic line or simply that they were lucky enough to combine the right genetics to make something new and desirable?

After scouring the web to learn about roses I discovered something frightening. Many rose varieties being sold have patents on them. This means you can't reproduce that variety in any way even if you don't intend to sell it. The repercussions of doing so can be very harsh and will most likely get you sued.

To scare you even more is the fact that many large plant distributors sell roses with patents on them. In 2003 Lowe's Stores started selling patent roses from a large company called Jackson and Perkins. Often these rose varieties aren't clearly labeled that they are under patent making it difficult for would be rose enthusiasts to feel safe trying to grow them.

The first plant patent was given to Henry F. Bosenberg in 1930 for the Climbing or Trailing Rose. Since then many roses have been placed under patent. These roses are then protected from DIY gardeners for a period of 20 years. After the patent expires it is then safe to propagate, clone, root, and reproduce that variety.

My front yard is practically a maze of rose bushes of every type. My grandmother started her rose garden before I was born and cared for it meticulously until the day she died. Even after her death most of the root systems were strong enough to survive an 8 year period of no care. I have been working hard since moving into her house to return the yard to it's former glory. Included in this was a goal of starting my own roses the way she did so many of them. Now I am facing the fact that I may need to grow from seed so that I know for a fact that my plants are not "illegal."

The problem with starting roses from seed is that the odds are against the average gardener. Many of the seeds will not grow. The ones that do are rarely a variety so pretty you can't let it go. Then there are the genetic concerns of root health, resilience to pests, cold tolerance and the list goes on.

Grandma's roses are old enough I feel confident that my yard is "safe" from legal action but I still have to wonder where each one came from. My mystery rose garden...

There is no such thing as a "true blue rose"

Sunday, October 21, 2012

Yard Work is Hard Work

It's been far too long since I've posted. I spent the better part of 2 months with no internet (unless you count a "smart" phone which I don't) which makes it very hard to blog. On the upside I've gotten more done in my newly acquired large yard than I would have if I did have the distraction of millions of people to socialize with.

So, how is my garden doing you ask? Meh. When I attempted to move all my lovely herbs from the former living space the few that survived the rough truck ride died shortly after arriving here. My chives hung on the longest but in the end they too slowly withered and had to be tossed. No worries though! I started new projects and my hubby thinks I'm even more crazy now... don't tell him he's probably right.

I ventured into my greenhouse the other day and was pleasantly surprised. It was relatively clean and free of bugs. Come spring it will be minimal work to clear it out and start my seedlings in it. The downside is the panels that make the walls need to be washed and the plastic seals holding them in have to be pushed back in constantly. Kinda cheesy design but very good for the price (FREE)!

I threw a few peach pits in some water to see what they would do. That was almost 3 weeks ago. They have long hairy roots coming out of everywhere now and I must transplant them into soil in the next week or so. Leaving fragile roots like that in water is never good for too long as it causes rot and roots don't like seeing the sun. Luckily I still have potting soil and LOTS of worm goo.

That brings me to my worms. I thought they were dead. I looked all over for them in the drawer and couldn't find one. I just left the bin sitting there for months until we moved thinking there was no point in feeding imaginary worms. When I finally threw it in my truck I saw that there were little red things slowly oozing through the soil and so I rejoiced! "They live, they live!" I texted my hubby. The wrigglers currently thrive in their same bin in my garage and I feed them about 2-3 lbs of vegetation each week. The bin gets heavier as time goes on and soon I will have to migrate them into a new one so the plastic doesn't crack under the pressure. My plants will love me this spring!

Onto my roses... a bit of a painful topic to be honest. My grandfather passed recently. I took a rose from his funeral and decided to try my best to keep it around somehow. My propagation may or may not work. Even if it doesn't though I pollinated one of my well established roses with it. The rose (on the bush) quickly started forming a hip (what rose seed pods are called) and I am monitoring it daily so I don't miss harvesting it at peak ripeness. I will harvest many rose hips this year as I rarely had time to prune the dead flowers. I will try to post more on this later with some photos. Of the over 50 bushes that were here at one point only 9 survived the mower. 2 are threatening to come back since I started watering them daily - thankfully the well established root systems of roses give them a good fighting change even after years of laying dormant.

My tomatoes are still growing and blooming. A few branches suffered from frost during the first freeze of the year but I'm amazed at how well they are doing this late in the year. Being against my house helps keep them warmer I think.

I started an outdoor compost with husband. That was a bit of an adventure... As we cleaned our yard up we spotted a plywood box that had been covered with plastic and overgrown with weeds for several years. We thought it would make a great compost container and started digging a 12" deep spot for it in a far corner of our yard. When we went to move the box to its new home though we quickly discovered yet another wasp nest - a very large one! I bolted as quickly as I could for the back door and even contemplated jumping the railing to get on the deck quicker. My husband climbed the fence on the other side of our property as they came after him and soon knocked at the front for me to let him in. We waited till this morning to spray them and plan to finally move the box to its hole tonight where I will layer grass clippings, fall leaves, dirt from the hole, and eventually some kitchen scraps. Should be god for the yard next year.

My oak tree turned colors the other day. Crazy how one day the tree is every color of red, orange, yellow, and green and the next day it looks bald. Nature had to give one last colorful show before winter set in. I wish my phone would let me transfer it to the computer so I could post... :(

No lovely photos for you today, sorry. I'll get on that for my next post.  ;)

Thanks for reading!

Tuesday, September 11, 2012

Feels Like Home Grown Tomatoes

     It's done! I'm finally moved. Might have been the hardest move I've had yet but it was worth it. Every aching muscle and sore joint was quickly forgotten the moment I tasted my first fresh tomato. Store bought tomatoes have nothing on these - NOTHING! I used to hate tomatoes. I avoided eating them at all costs. The texture of store bought tomatoes was all wrong - slimy and mushy. The taste of store bought tomatoes was... well, not there.


Juicy little round tomatoes from my planter box.
     Now these... Beautiful, freshly picked, all organic, and raised with love and care. These tomatoes are freakin' fabulous! They are tangy and bright with a firm texture that  yields nicely when you bite. I never knew that this is what tomatoes really are. I could live on them!

     Just last night my husband complimented my chicken tomato soup saying it was, "the best he had ever had." I blame the home grown tomatoes.  :)


If ever there was a plant to grow yourself... it is a tomato plant.


Here's a lovely picture to close on. One of the remaining rose varieties around my grandparents house. When Grandma was alive she had more than 50 types. Now there are only 7 or 8 types but they are still beautiful.

Rose from Grandma's House. Grandma has been gone for years but her roses live on.

 
Keep checking for more garden updates!

Thursday, August 9, 2012

Giddy About Garlic


Mmmmmmmm... Garlic!!!


     I started some garlic in my window the other day. Yes, I know I said I wouldn't start anything new until after the move but I just couldn't resist. They were sprouting anyways so I figured why waste? I grabbed a tiny glass jar and stuffed them in root side down with a quarter inch of water. They seem to be doing great! We will see what comes of them in the near future.


     The green onions I had been keeping in a vase on the window sill did well until I ate them all. I guess it's time to go fork out another 60 cents for my next 2 month supply. It's worth it though. The last batch kept fresh (adding new growth each day) with no refrigeration and had me making amazing eggs the whole time I grew them. My husband even got fond of chopping himself fresh green onion on top of anything he pleased. I do keep scissors near the green onions to make it that much easier to just cut them whenever and I change the water everyday to prevent the roots from rotting. A little bit of work will have you eating better in a jiffy if you decide to try this.


If you would like to follow me on Pinterest I have over 2700 pins at this time of which over 150 are garden specific ideas. Check it out and let me know your thoughts!

Tuesday, August 7, 2012

Sloppy Dead Greens

I find myself needing to post and not wanting to. This month has been insane. I've been helping my family clean my grandfather's house on top of cleaning my own. I'm trying to wrap up a charity event I led during July, get the donations ready for the August event, and not forget the big yearly donation due in October. I have my hubby's birthday this month and I just signed a lease on a new home that starts September. Oh and did I mention I want to take on more projects after the move?

I moved my plants to my lovely green room and watered them every morning. It didn't take long for me to figure out which plants needed more light, they died. The survivors are my chives, the basil, a few radishes that sprouted after replanting, and a couple carrots. The spinach is gone along with the parsely (it held on for a while). I have decided not to start anything new for now and to instead focus my efforts on moving. I will have a greenhouse at my next house so I feel my efforts will perhaps be better rewarded. Should the greenhouse be unfit to use (it has been unloved and unused for many years) I will start on ideas to make my own.

I'm sorry for the absence. I promise next month will mark the start of a new garden (with my hearty survivors) and posts with better detail. I failed the first attempt but I will not give up!

Someday, I hope to feed myself like this and harvest it all from my yard...

Tuesday, July 10, 2012

Dig Your Roots in Deep

Ladybug in my Garden Window

     My lease will be up in under 2 months where I am currently living. My husband and I will not be renewing it as we hope to be able to move into a house with a large yard. Either way, my gardening will continue year round. The house we hope to get has a greenhouse in the backyard that the owners may leave for my use. Just thinking about the possibility of having an actual greenhouse makes me smile ear to ear. My limited space would be a thing of the past.

Basil
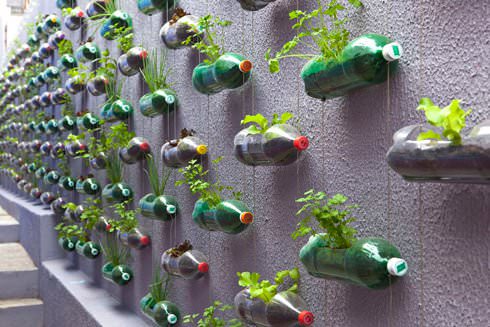
     With all the rain we've had the past week I've had plenty of time indoors to spend on my plants. I finally got my first round transplanted into the recycled 2-liter containers and hung up in the grow room. I learned that hanging more than 3 per vertical strand is too heavy so I will keep making them in sets of 2 and 3.

     Making the recycled planters is quick and easy (not to mention cheap.) Rinse an empty soda bottle (any decent size plastic bottle will work), turn it on it's side and use a rotary tool (or whatever tool you like) to cut the round top opening where the plants grow. Directly opposite the hole you just made drill 4-6 small holes for drainage. These drainage holes will face the ground and prevent your recycled planter from collecting too much water (which will kill your plants.) I drilled 8 holes total to tie strings that hang the planters. Two on the top left, two on the top right, and 4 holes directly opposite those on the bottom.

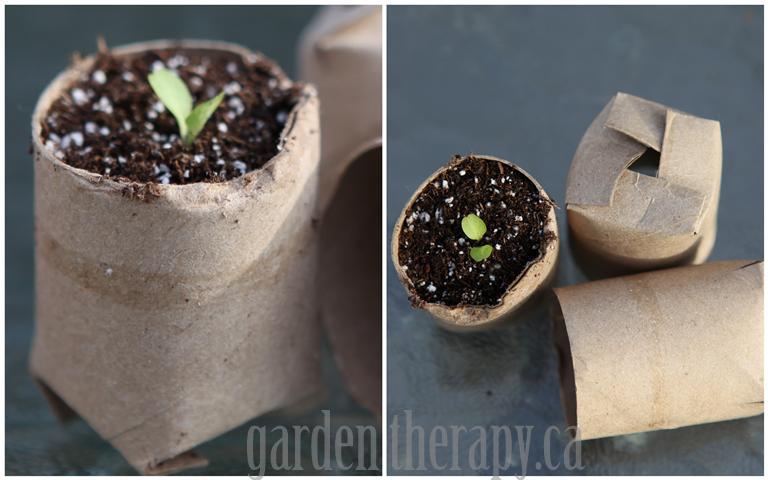
     Before putting any soil in them I covered the holes on the bottom with rocks. Not doing this results in soil running out the drainage holes over time. I used rocks that I found around my house. Most of them were about quarter to half dollar sized. Minimal amounts of soil will wash away now.

     When I water I start on top and let it run down before watering the lower containers. In this way the garden is very efficient on water. The only waste is what comes out of the bottom container of each column. This of course is slowly being eliminated as I stack metal canisters of carrots and radishes under them. My garden consumes about 12 oz of water per day right now.

      As I am trying to do this on a budget I have been looking around for ways to make my own fertilizer at home. I accomplished this by using vegetable waste that would normally either be thrown away or fed to my worms. For my first batch I boiled the odds and ends from all the fresh produce used in a chicken and vegetable soup. I had the green vine from tomatoes, the peel of 1 yellow onion, celery tops, bell pepper core, and garlic peel that I threw into a pan with some water. I simmered this vege waste for about 2 hours then transferred it to the fridge to cool overnight. The process of cooling will help leach some of the nutrients from the waste as well. The liquid should be a mostly transparent amber color.

     The next morning I strained the cooled vegetable water poured it into an empty 2-liter bottle. My bottle was about 1/4 of the way full so I mixed it to the top with tap water. When I use this mix to fertilize I cut the strength down even father by mixing it 1 part fertilizer to 3 parts water. By the time the fertilizer is fully mixed and ready to use it has barely any color at all. There shouldn't be any large chunks of waste matter in your mix when finished. Cheesecloth, nylons, or a very thin old t-shirt can all help strain the mix to get chunks out. The finished watered down mix can then be used to water your plants like normal. I plan to fertilize once a week with this to start. I will adjust as needed and let everyone know if this worked well or what changes need to be made.

Recycled Planter hung with 2 nails
    To make sure my planters didn't fall I stuck two nails in the wall an inch apart. One planter hangs off both. This allows me to hang 3 recycled planters per column without worrying about the weight making it fall. If I need to hang more I will simply have one column of 3 hung above another column of 2 or 3.

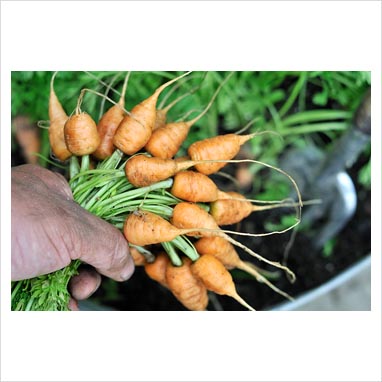
     At this point in time I have Radish, Carrot, Basil, Chive, Parsley, and Spinach in large containers and all of those except spinach started new for the next rotation. I'm beginning to see which plants need to be started in advance and which ones work better if they aren't transplanted. Spinach, Basil, Chive, and Parsley work fine to transplant. Radish and Carrot I will most likely start directly in the large planters from now on. If I have excess of anything I plan to make use of it by bartering with people I know for other things. One of my friend's mothers likes to cook with fresh herbs and has already expressed interest in fresh or dried from my crops. My own mother will take spinach. The carrot and radish will be used in my house no question. Excess vegetables are a blessing. Even half rotten is of value to me now that I have a working vermicompost.


Full Double Rainbow in front of my house


Wednesday, June 20, 2012

Momma Left Her Babies Behind

My husband and I went away for the weekend. We decided to spend some well deserved time relaxing with family in Beaver Creek (Avon) Colorado. I was so excited I had our bags packed two days in advance. My parents came over twice a day to check on the mutt and water my plants. I was sure everything was taken care of but I came home to proof that only mama knows best how to care for that which she loves.

We had some great views while mountain biking.

When I left I had 5/6 Radishes sprouted and healthy looking, 1/4 of the carrots sprouted, and 1/3 of my spinach going. I came back to 2 dead Radishes and a worm bin that had been over watered somehow. I guess this Environmentally friendly stuff isn't as easy for my parents as it is for me. I could let it aggravate me but I'll just start a few extra plants to compensate on the next round. I did get free dog sitting and plant watering after all.

Worm bin before I left... nearly no gnats.
My instructions about the worm bin were to sprinkle the top with a few ounces of water every morning and to throw extra soil on top if there seemed to be a lot of gnats. There was no extra soil and the fruit flies were having a hay day when I got back. It only took me about 2 days to curb the flies by tossing extra soil on top and I still have yet to water the worms as the bin is recovering from the somehow excessive watering. I put a fan near the bin to keep constant air flow around it and help even out the moisture to the correct level. My worms are fine, it's just that happy balance I had when I left that is still missing. I really miss waking up to that earthy fresh rain smell in my kitchen and I hope it comes back soon. That was the biggest sign to me that I had achieved the perfect balance in the vermicompost. Yes, my worms are still in my kitchen in and I plan to keep them there. When the balance is right in the bin it acts like an air freshener (in my opinion.)

My herbs are doing great and need to be replanted soon. My green onions are growing faster than I can harvest and I'm about due to start another round of veges to keep the cycle going. I'm just thankful I was only gone a few days or I might have been in worse shape.

Parsley looking very pleased.

Monday, June 11, 2012

Rearing Radishes


Recycled Paper Towel Tube

The 6th of this month (6/6) I planted 6 Radishes, 4 carrots, and 3 spinach in recycled cardboard cylinders. On the 9th the radishes sprouted. Carrots are slow to germinate and the spinach I expect any day. I was very pleased to see the first little radish poke it's head out so quickly. It looked vibrant and full of life catching the rays of the morning sun.


Radish Sprout

My other herbs are looking lovely despite being dropped yet again during an attempt to open a window. Luckily they are rooted well enough now to keep themselves mostly in place. The chives that were so slow to sprout are now so tall I had to move them out of the greenhouse. I decided to move the basil and parsley too so I could store my little plastic container for later use.


Chive Basil Parsley


I'm feeling Green Onions

green onions grow vase
Green Onions growing in water

I bought some green onions the other day while I was getting groceries. I love anything in the onion family for cooking. I had seen where people were keeping their store bought green onions in a glass jar with just some water to keep them going. It's a really neat trick if you use green onions on a near daily basis like I do. You simply put the remainder of the white ends with the roots in a vase with water like you would flowers and change the water / trim off any dead parts every other day. I keep 2-3 inches of water in the vase for them and they give me about 3/4 cup of the green tops every week.


Nothing beats fresh!!!


green onion roots grow in vase
Green Onion Roots in a vase
This is Home for now   :)

Wednesday, June 6, 2012

I've Got Worms

I'm so happy and excited I'm giddy today! All because my mother in law sent me worms from her vermicompost to start mine. My husband walked in with worms (red wrigglers - Eisenia fetida) wrapped in shredded paper and balled up inside 3 plastic bags. I immediately unwrapped them and layed the mass on top of the bed I had prepared for them. I poked around a bit to see if I could find the worms and I did but they quickly burrow into the bedding when the light hits them so they aren't visible long enough for a good photo. Here are my next step by step instructions on preparing a vermicompost.


Fill cleaned plastic bins with water and let soak for a few hours
1. After obtaining my two drawer plastic storage container I washed it with some lemon window cleaner and then rinsed both drawers. I wanted to make sure the plastic didn't have any chemicals or foreign matter since I bought them used so I filled both drawers with water and let them soak in my tub for several hours.


You can see how I did the holes in the bottom of the drawers in this picture.
2. I dried my plastic drawers once I was sure they were clean and grabbed my rotary tool for the next step. The top of both drawers is open to the air so I eliminated the holes on the sides that most plastic totes say to make. Instead I made two 1/2" wide by 5" long cuts in the bottom for drainage and to act as a portal when I'm ready to migrate my worms. I also drilled 4 small holes around these just to be sure I have enough airflow.


Arrange cardboard in your drawers anywhere light might come in.

3. Once I had the holes in the bottom of the drawers I cut up a cardboard box and line the clear plastic with it anywhere I thought light might come in. Worms don't like light so giving them a dark drawer to live in will make them happier and less likely to escape.


I shredded enough paper to fill the drawer 1/3 when wet.
4. My next step was to prepare plenty of shredded paper which acts like bedding for the worms. I don't have a shredder so that nice pile in the picture was cut by hand. If you have access to a shredder I would recommend that but cutting by hand isn't too bad if you have sharp scissors. Another trick is to fold the paper in half a couple times so that it takes fewer cuts to make one strip.


The paper bedding is moist but not soggy.
5. I added the shredded paper a little at a time so that I could wet each layer with a water bottle. I used a bottle with a sport type lid on it so that I could spray the paper faster than a mister but not as fast as just dumping water right on. I used a bunch of junk mail I had laying around (provided it was the non-glossy paper), scraps of paper I had jotted notes on, dry paper towels (clean - no meat, chemicals, or fat on them), and a few brown paper bags. I think having diversity in the compost will create a higher quality end product.


6. This damp paper bedding was left overnight (I wanted it ready before the worms arrived) to allow all the pieces to come to an even moisture level. The next morning I added a little more water since the top felt drier than when I went to bed. I had a couple handfuls of soil to add to the top since worms need "grit" to help digest what they eat. I'm holding off on adding food until I'm sure I created a proper environment that will aid their reproduction. My fear is that if I add food before the worms are acclimated to my bin then the food will start to rot and attract other pests.


Closeup of moist paper bedding with a handful of soil on top.
7. When the worms arrived I simply unwrapped the plastic holding them in a wad and laid the mass on top of my moist shredded paper. I spread the wad o' worms out a bit and left the drawer open so the light in the room would drive them into the bedding I had made. I was a bit worried since I had read that worms can sometimes crawl out of their bin and my compost bin is still in my kitchen, but I haven't seen any escape artists yet. I figured my kitchen was actually a good place to start them for a variety of reasons. I always leave the light on in the kitchen which is a great way to discourage the worms from leaving the drawer, the temperature is always around 70 degrees Fahrenheit, and the floor is linoleum in case I have a mess.


8. The last step in the setup of a worm compost is just to maintain it. Check it regularly to see that the moisture is appropriate and the temperature is right. It is recommended that you feed them your kitchen scraps about once a week. Remember that worms are basically vegan and won't eat any meat, dairy, or fat and adding these things will cause a foul odor and attract pests.


In the coming weeks I will post more on this topic. I plan to give more info on the length of time it takes to establish my vermicompost as well as time to complete one bin. I would like to observe what the worms prefer to eat and give instructions on making a "holding bin" from mostly recycled materials. The holding bin will give me a place under the kitchen sink to store food scraps for the worms without letting off odor.


Thursday, May 31, 2012

Eternally Busy

This is just a quick update on my plants. The herb garden is still doing great. The Basil is almost 2" tall, the chives are over 2" tall, and the parsley is starting to thicken up and look like a little bush of sprouts. I have had to start watering once a day now since the plants are getting big enough to drink more.

My planters are coming along nice. I have an ample supply of 2-liters already washed and cut, now I just need to find the time to string them together. I have been getting old bras from family members to make more planters with and thankfully the rest of my family is a little better endowed so I should have some in sizes big enough to grow more than just herbs.

I still need to make time in my schedule to get a bag of soil and seeds. I will need to do that in a week or so to ensure I can transplant my herbs on time. Plants that don't get moved to a bigger pot become root bound and won't grow well. Sometimes this is used as a tool to keep a plant at a size that the grower likes such as a Bonsai Tree. I will be trying to avoid root bound plants though since I want to maximize my yield.

The nice thing about gardening is that you can take your time. Nothing grows overnight so there's rarely a need to panic. As long as I check on my garden everyday it will give me plenty of warning when it needs something.

Saturday, May 26, 2012

Vermiculture: Preperations


I bought my vermiculture container the other night. It was $5.99 at the Arc for a two drawer plastic container on wheels. I made sure the drawers were the same size so that I can fit them both in either the top or bottom slot without a problem. I specifically wanted something with 2 drawers to make it easy for me to migrate the worms from the first bin to the second when I am ready. I also think I can get into a routine where one drawer is in process while the other is finished and ready for my use.

From one of my favorite blogs: Electric Tree House
To prepare the composter I started by washing it with a mild cleaner (like Windex). I did this to make sure the drawers didn't have any mystery particles from the former owner. After the drawers dried I placed them in my bathtub and filled them with water for several hours to remove the traces of cleaner and anything else from the plastic. I will pour this water out and repeat the step again at least once more just to be safe. This way I'm not worried about what used to be in the drawers or could've gotten onto them before they came to me.

Once I was sure my worm drawers were clean I started making holes for ventilation. Airflow is key to keeping the worms alive and the food from rotting (which causes odors). I prepared the bins in a manner that will encourage downward migration. For this I used a small rotary tool (though a larger drill would have been nice) and cut 2 long 1/2 inch wide slots and 4 small 1/4" holes in the bottom of the drawers. I can put a piece of cardboard over the slots to keep the worms in the bin until they are ready to migrate to the next bin. The clear front and back of the drawers will be lined with cardboard as well to keep light out. If it works like I envision then the worms will slowly eat the cardboard until it is gone and then they will be able to move down into the new drawer with fresh bedding and food.

I have a small tray to put under the drawers to catch the worm juice that comes out the bottom and I will be able to use that as a fertilizer. When I have things in full production the top drawer will have finished compost that I can just reach in and use while the lower drawer is in progress. This combination of worm tea fertilizer and vermiculture compost should have a very positive effect on my plants and allow me to send less waste to the landfill.

Friendly Worm Guy
As for a source of worms... Most places I have looked want $20 for half a pound of worms. Worms reproduce quickly (red wrigglers do so within 45-60 days according to other sites) so I don't feel I need the full amount to start. As a frugal grower I determined I would find someone with worms that would trade with me for something I have. To my astonished luck my in-laws came to visit yesterday and said they have plenty of worms they will give me in trade for some of my art. I am thrilled! Hand painted cards for worms sounds like a great trade to me!

The running total spent is still around $10 and with my soil coupon I believe I can start my first round of vegetables for under $20. I think my first round of indoor veges will take more time and effort but a comparable amount of expense to those I would buy in the store. The subsequent rounds will start to cost me less as I get everything set up.

More good sites I found to read on composting with worms:
Pure Green Living
Sierra Worm Compost
Vermidragon


Thursday, May 24, 2012

Parsley Joins the Party

Yesterday I noticed my first parsley sprout peeking over the top of the soil after my little mishap. It was still just a tiny little green loop that would go unnoticed to someone not interested in the daily progress of my plants. Today I woke up to see 3 strong sprouts looking ferocious and ready to grow. This progress pleases me as I didn't expect the parsley to start this quick. Everything I had read before this said that parsley was hard to start and took lots of patience. The average time for germination was 3-4 weeks and mine accomplished the arduous task in less than 2 weeks!

My basil is looking great, like a little green bush sitting on top of the soil. I can't wait to transplant it in a few weeks! I imagine my chives will be ready at the same time too and if I'm lucky my compost pile will be ready shortly after. I still water every other day but that will probably change by the end of this week.

I estimate I will need around $5 for a small bag of basic soil and that I will need it in roughly 1-2 weeks. When I buy soil I don't look for fancy stuff with this and that added. I look for something that is "well-drained" or has a low content of vermiculite (the tiny white pebbles) already in it. Well drained soil is important as it helps prevent the plants from damping off if you over water. I know I will have to water more often at the start than I will once my compost is being added. The compost will not only add vital nutrients for the plants but will improve the soil structure allowing it to hold more water without smothering the roots of the plants.

I bought my worm bin yesterday too and will write a separate blog later on how I am preparing it for my worms. As the sign at the thrift store said, "Put the earth first and buy second." Not only did I save money buying a pre-loved container but I saved that much space in the landfill too!

The running total for my garden supplies so far:
     $4.07 for seeds and starter soil
     $6.41 (with tax) for a worm bin
=  $10.48

Wednesday, May 23, 2012

All Topsy Turvey

I had a minor set back this morning. Before I could water my miniature plastic greenhouse and set it back in the window my son got his hands on it. He quickly did a lap around my living room with my husband and I chasing him and then dropped it on the carpet. Soil and tiny Terra Cotta pots went rolling everywhere and all I could do was fall to my knees and try not to cry.

One of the hazards of living in a small space is that I have no space. My desk is within my sons reach so I either balance everything precariously on a high shelf or push it so far back on the desk it takes him an extra second to get it. Neither method works very well and it often irritates me to no end that I have no place of my own that is safe to plop my treasures. I constantly battle negative feelings as I watch my beloved creations get ruined and it seems like I'm the only one that sees anything wrong with it. My son is still to young to understand which is probably half the reason I can move on. Once I have all my seeds started and arranged in my grow room it should be easier since he won't be able to get to it.

After I got over seeing my little sprouts laying helplessly on the floor I started scooping the soil back into pots and gently patting things back into place. The damage to my plants that have sprouted seems minimal but I am waiting a few days before I will think everything is back in order. I have one Parsley that I noticed had sprouted but as it's the only one I am now worried that some of the unsprouted seeds may have gotten picked up with the soil that fell out and placed in the pots with my Basil and Chives. As a perfectionist I find it incredibly frustrating to think about my plants getting mixed up in pots together. I don't think it would affect the plants in any way but it would make me pissy every time I looked at it. I guess if that does happen I'll just have to start over or learn to deal with it.

Lesson of the day: keep toddlers away from freshly sprouted seeds.
Goal of the day: clear a space for my things so I can feel better.

Monday, May 21, 2012

Decisions Decisions

 Choosing the Right Plants


Today is day 8 of my Urban Garden Project. The herbs I started are popping out of the soil more each day. I'm still waiting on my Parsley to sprout but that doesn't surprise me as it is known for being slow to start. My basil has begun to stretch taller and looks like it already wants to add more leaves. The chive sprouts are more than just a green spec at soil level now and have since split into thin segments that remind me of grass. I've been watering things every other day so that the roots won't get too wet and rot. Damping off, as it's called, is a common reason indoor plants die.

As my garden progresses I find myself thinking more about what else I will plant. What do I want to cook with in 2-3 months? I must take into consideration things like root space, sun and temperature requirements, production time, and any other specific needs a type of vegetable would need. For this info I look to Google. (The chart at the very bottom of this page is useful.)

From reading materials and knowing what I like to cook with I have compiled a list that I will keep in mind when I go to acquire seeds. This list has already been narrowed down to what I think will work with partial sun, small space, and won't be hard to maintain.

Picture used from here
   ~ Strawberries
   ~ Onions
   ~ Carrots
   ~ Cherry Tomatoes
   ~ Spinach
   ~ Herbs
   ~ Lettuce/Kale

Each of these plants I will research individually at this point to see what to look for when buying seeds. On my tiny budget it's very important that I choose plants that will give me the best chance to succeed. I am particularly excited to try my hand at strawberries. They are one of my favorites and I've never grown them before. From my readings I've determined that an Everbearing variety would be my first pick since they tend to do the best in containers. One of the biggest challenges of growing strawberries is birds. They love to pick them before humans get the chance. Growing them indoors will prevent this and hopefully greatly increase the amount I get to eat!

Spinach and Lettuce are quick producers that I can continually harvest as needed for several weeks until the plant tires out. After a few weeks of continual production the nutritional content of these will start to decline as well as the taste. These are crops I will need to continually plant every 3-4 weeks to have new ones ready to go.

Carrots are said to do well in containers and with partial sun so I plan to have these closer to the ground in my grow room. The windows are high in the room so any plants that need more light will be hung higher. Anything I plan to harvest regularly I will also keep within arms reach to make it easier on me and encourage the maximum usage of my fresh produce.

The actual varieties I will use will depend on what is available at the store as well as what the packet says the variety needs. Some types will do better in containers than others such as the small tomatoes will commonly do better than the beefy varieties that are known for producing large fruits. I believe that the basic types of plants I have chosen to start with will encourage success and help me get into the routine of constantly sowing seeds. Once I feel comfortable with the amount I am growing I will be able to decide what else I would like to add without fear of overburdening myself. I want to avoid waste if at all possible which I can help to prevent by starting off slow despite the fact that I am extremely excited to have fresh from home produce.

I also decide today that should I need a quick and easy addition to a salad fresh sprouts would be a great option. There are many different types and they all produce quickly for consumption. Sprouts also have very high nutritional value for such a small package. I am still looking at ways to grow potatoes in a small area. I haven't found anything yet but I am confident I will.
Kale is in the cabbage family and works great for cooking!


Saturday, May 19, 2012

New Beginings

Basil sprouted 4 days after planting
 
On Recycled Seed Starters, DIY Planters, and Garden Plans
 

Late in the evening on May 13th I started a simple herb garden in my window. I have been saving empty 2-litters, plastic coffee containers, and collecting pre-loved bras for at least 2 weeks now (though the bras admittedly have been waiting much longer to be re-purposed) in an effort to have garden containers readily available when I need them. My herb seeds (basil, chive, and parsley to start) poked a few sprouts above the soil the two days ago (May 17th) and seem to be doing well so far. Today (May 19th) my chives have started to show and my basil is looking great! I know that in another 2-3 weeks I will most likely need to transplant them so today I am trying to plan ahead for the next steps of my urban garden project. As part of my full-cycle process I want to document every step of the process from seed, to table, to compost, and back to seed again.

I started my herbs from seed, not because this is the easiest option, but because it is the cheapest. My mother bought me a starter set that came with the soil, seeds, a little plastic greenhouse, and adorable Terra Cotta pots that I would not have spent my own money on. Had my mom not bought me the starter set I would have used one of two recycled options to start my seeds, either empty toilet paper tubes or a cardboard egg carton. I will quickly cover both of these methods since I will have more opportunities to explore them in depth later.

To use an empty cardboard tube for seeds simply save the tubes that toilet paper and paper towels come on. Toilet paper rolls need to be cut in half while paper towel rolls need to be cut into more segments. Each cardboard tube segment should be about 2" long. Once you have your cardboard tubes segmented cut 4 slits 1/2" long on one side and turn in the segments like shown in the picture. This will keep soil in while still letting water drain out. Fill with soil and plant seeds as recommended on pack. When ready to transplant you can either leave the plant in the cardboard starter and it will break down over time, or you can take the plant out to speed it's capabilities of spreading roots.
 
The process of using egg cartons is less work initially. Make sure the egg carton is cardboard, not Styrofoam as some of them are. Poke a few small holes in the center of each egg pocket to allow better drainage and fill with soil. Plant seeds as recommended on pack. When ready to transplant pop out each section one at a time and transfer to larger pots.

The amount invested at this moment is $4.07 and I will count it even though it wasn't actually my funds. I estimate the cost would have been similar had I bought a bag of soil and seeds and used recycled seed starters instead of getting cute little pots from my mom. Luckily I will have these pots for future seeds but at some point I know I will be using recycled seed starters as I only have 6 little pots. 

The things I will need when I am ready to transplant my herbs are a container at least 4-6" deep, soil, a room with plenty of light, and water. For my herbs I am going to start them in two types of containers to see which one does better. A handful of basil, parsley, and chives that have started will go into one of each container. The first type is made from recycled two-liter bottles and clothesline. The second I sewed from scraps of fabric and old bras. 

Makeover by Rosenbaum
To make planters for herbs from empty 2-liter bottles scissors, nail, and a hammer or a rotary tool will work. I wash mine with plain water and take the labels off. I then use my rotary tool to drill 5-7 small holes in a line vertically where the label was. As the container will be hung on its side these holes will face down and act as drainage. Opposite the line of holes I cut an oval roughly 7" long by 3" wide. This large oval is where the plant will be placed. Toward the top of the bottle I drill 2 small holes on either side of the oval (about an inch away) and repeat this toward the bottom. Then I flip it over so that the drainage holes are facing me and I drill 4 holes opposite the ones I just drilled on the top. These holes are where the 2-liters get strung together so that they will hang in a manner that is organized and gives you the most space. I used plain clothesline that I already had but any sturdy type of twine or cord would probably work just as well. To make the top tier of my hanging planter I thread one long cord (about 6' long) through all the top holes on one of my bottles and tie a knot so that it can hang from a hook. This means there are 4 lines going from points around the large oval all the way to the place the planter is hung from. To attach the second tier cut two lengths of cord just over double the distance you want the tiers to hang apart. One cord connects the lower left portion of the first bottle to the upper left portion of the second bottle while the other cord connects the right sides of the bottles. When properly strung the 2-liters will lay on their side (keep the caps on) one about a foot directly above the other. To have more tiers to grow in simply repeat the process with more bottles until you have the number of layers desired. For more examples of this see the article I read.

The recycled bra planters are my favorite concept container but I haven't tried it yet myself to say if it works. I have 3 small bras that I took the underwire out of and fastened on the largest setting. Then I sewed a rectangular scrap of fabric in the bottom of the torso hole to make a bowl. (If you decide to make one yourself and are sewing with a machine make sure you are careful stitching around the metal fasteners so you don't break a needle.) I plan to mount these with hangers and try one of each type of herb in them. 

I researched composting options today because I can see how my house would benefit from reducing the amount of waste we generate and saving money on fertilizer as well as I see it as an opportunity to teach my son about the full cycle of life. I decided to do vermiculture which is composting with worms. They speed up the process and reduce the smell making it my ideal option. My small garden room is actually a stairwell entry so everything I grow has to fit in the width of a narrow stair. I will be purchasing red wriggler worms, soil, and some plastic totes which I estimate will cost around $40 if I have to buy new. If I happen upon two garbage bins in goodwill I will probably think about that as a cheaper option. I just have to be able to drill holes in it so the worms can breath. I can't wait to see that little boy excited look on my son's face the first time he sees a worm!

Chive Sprouts - 6 days after planting